Basic button script
Basic button script
Before starting the tutorial please ensure that you have read through tutorial 1 "Getting Started".
In this tutorial we are going to add a button to the MovieClipOverlayCameraBehaviour. We are using the overlay behaviour because it is ideal for Huds, menus, interfaces etc. It is also primed to work with pixel space, so any movieclips attached to the MovieClipOverlayCameraBehaviour will have exactly the same dimensions as the imported assets from the original fla file.
Step 1
In Unity, create a new scene (File - New Scene) and attach the MovieClipOverlayCameraBehaviour to the Main Camera, (by first selecting the Main Camera in the Hierarchy and then selecting (Component - uniSWF - MovieClipOverlayCameraBehaviour)). The uniSWF inspector will now be available when selecting the Main Camera. Because we are going to add a button, go to the uniSWF panel in the Main Camera inspector and activate the following - interactive and enable mouse over (See Picture). This is important as the button is an interactive entity.
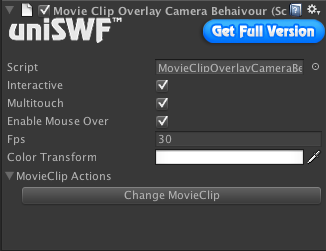
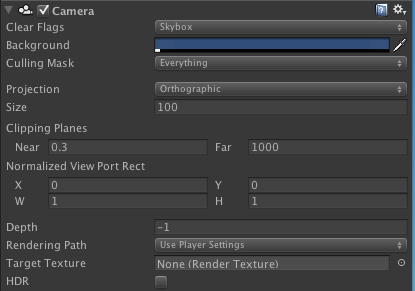
Make sure the Main Camera is switched to Orthographic mode as this will ensure the asset is displayed correctly and will also aid hit detection.
Step 2
Create a folder in your project and call it scripts, then create a new JS file and call it "simpleButton"

Double click on the new JS file in your project to open up your default development environment. The first lines of code will be to import the necessary api to work with the Flash assets.
using UnityEngine;
using pumpkin.events;
using pumpkin.display;
These two lines will give you access to event and display object libraries and will enable you to work with the imported assets in a similar way you would in Flash Actionscript (for those who are familiar with AS3), if not don't worry as we'll go through it step by step.
If you are using Monodevelop it will create some default functions for you, you should have script that looks like this :
using UnityEngine;
using System.Collections;

public class NewBehaviourScript : MonoBehaviour {

    // Use this for initialization
    void Start () {

    }

    // Update is called once per frame
    void Update () {

    }
}
Now what we'll do is bind this into a class structure and add the variables we need, so we should have the following :
using UnityEngine;
using pumpkin.events;
using pumpkin.display;

public class Tut2_SimpleButton : MonoBehaviour {

    Stage stage;

    #region ButtonSetup
    void Awake() {

    }

    void Start () {

    }
    #endregion
}
note - the variable stage is used to reference the main Stage which is a display object container that resides within MovieClipOverlayCameraBehaviour. The Stage is not globally available and needs to be accessed through the stage property of the MovieClipOverlayCameraBehaviour.
For this example we are going to put the bulk of the code in the Start() function. The first thing to do is to ensure we have access to the MovieClipOverlayCameraBehaviour, which we attached to the Main Camera. We ensure this by the following block of code…
    void Start () {

        // validate MovieClipOverlayCameraBehaivour is attached to camera
        if( MovieClipOverlayCameraBehaviour.instance == null ) {
            Debug.LogError( "Failed to get MovieClipOverlayCameraBehaviour, ensure its attached to the MainCamera" );
            return;
        }

        // assign stage reference
        stage = MovieClipOverlayCameraBehaviour.instance.stage;
    }
Once we have access to the MovieClipOverlayCameraBehaviour we can now reference the stage. This is attached to the camera and any asset attached will always appear on top.
Step 3
The following line of code creates an instance of the btn_ui MovieClip
MovieClip btn = new MovieClip( "uniSWF/Examples/Tutorial 02 - Basic button script/swf/Tut02-ButtonAsset.swf:btn_ui" ); Once instantiated, we now have control of the MovieClip. Positioning the clip is achieved by simply applying values to the x,y properties.
btn.x = (stage.stageWidth / 2) - (btn.srcWidth/2);  // Center on stage for the current screen size
btn.y = (stage.stageHeight / 2) - (btn.srcHeight/2);
Here we tell the movieclip to stop on frame 1 and instruct it to disable mouse children. Disabling mouse children ensures the button is receiving mouse clicks and not its contents. The next step will show you how to add mouse events.
btn.gotoAndStop(1);  // Jump to first frame and stop
btn.mouseChildrenEnabled = false;  // Inner display object such as text fields will not recieve events
Step 4
This step will take you through the process of setting up event listeners to detect when a mouse event has took place and set up explicit functions to act on the mouse events
// event listeners
btn.addEventListener( MouseEvent.CLICK, onButtonClick);
btn.addEventListener( MouseEvent.MOUSE_ENTER, onButtonEnter);
btn.addEventListener( MouseEvent.MOUSE_LEAVE, onButtonLeave);
And finally to complete the code within the Start() function we need to attach the "btn" clip by the following -
// add menu clip to stage
stage.addChild(btn);
Just to recap, we should now have a class that looks something like this...
using UnityEngine;
using pumpkin.events;
using pumpkin.display;

public class Tut2_SimpleButton : MonoBehaviour {

    Stage stage;

    #region ButtonSetup
    void Awake() {

    }

    void Start () {

        // Validate MovieClipOverlayCameraBehaivour is attached to camera
        if( MovieClipOverlayCameraBehaviour.instance == null ) {
            Debug.LogError( "Failed to get MovieClipOverlayCameraBehaviour, ensure its attached to the MainCamera" );
            return;
        }

        // Assign stage reference
        stage = MovieClipOverlayCameraBehaviour.instance.stage;

        // Create menu clip
        MovieClip btn = new MovieClip( "uniSWF/Examples/Tutorial 02 - Basic button script/swf/Tut02-ButtonAsset.swf:btn_ui" );

        // Center on stage for the current screen size
        btn.x = (stage.stageWidth / 2) - (btn.srcWidth/2);
        btn.y = (stage.stageHeight / 2) - (btn.srcHeight/2);

        // Jump to first frame and stop
        btn.gotoAndStop(1);

        // Inner display object such as text fields will not recieve events
        btn.mouseChildrenEnabled = false;

        // Event listeners
        btn.addEventListener( MouseEvent.CLICK, onButtonClick);
        btn.addEventListener( MouseEvent.MOUSE_ENTER, onButtonEnter);
        btn.addEventListener( MouseEvent.MOUSE_LEAVE, onButtonLeave);

        // Add menu clip to stage
        stage.addChild(btn);
    }
    #endregion
}
Step 5
The next step is to set up the button event functions. The three functions are as follows...
    #region ButtonActions

    void onButtonClick( CEvent e ) { // MouseEvent but be declared as CEvent
        MouseEvent mouseEvent = e as MouseEvent; // Cast event
        Debug.Log("onButtonClick() Called");
    }

    void onButtonEnter( CEvent e ) {
        MovieClip m = e.currentTarget as MovieClip;
        m.gotoAndStop(2);
    }

    void onButtonLeave( CEvent e ) {
        MovieClip m = e.currentTarget as MovieClip;
        m.gotoAndStop(1);
    }

    #endregion
The functions receive events dispatched by the listeners attached to the button, so from here we can get a handle to the btn that dispatches the event and manipulates it.
The final version of the class should look like this :
using UnityEngine;
using pumpkin.events;
using pumpkin.display;

public class Tut2_SimpleButton : MonoBehaviour {

    Stage stage;

    #region ButtonSetup
    void Awake() {

    }

    void Start () {

        // Validate MovieClipOverlayCameraBehaivour is attached to camera
        if( MovieClipOverlayCameraBehaviour.instance == null ) {
            Debug.LogError( "Failed to get MovieClipOverlayCameraBehaviour, ensure its attached to the MainCamera" );
            return;
        }

        // Assign stage reference
        stage = MovieClipOverlayCameraBehaviour.instance.stage;

        // Create menu clip
        MovieClip btn = new MovieClip( "uniSWF/Examples/Tutorial 02 - Basic button script/swf/Tut02-ButtonAsset.swf:btn_ui" );

        // Center on stage for the current screen size
        btn.x = (stage.stageWidth / 2) - (btn.srcWidth/2);
        btn.y = (stage.stageHeight / 2) - (btn.srcHeight/2);

        // Jump to first frame and stop
        btn.gotoAndStop(1);

        // Inner display object such as text fields will not recieve events
        btn.mouseChildrenEnabled = false;

        // Event listeners
        btn.addEventListener( MouseEvent.CLICK, onButtonClick);
        btn.addEventListener( MouseEvent.MOUSE_ENTER, onButtonEnter);
        btn.addEventListener( MouseEvent.MOUSE_LEAVE, onButtonLeave);

        // Add menu clip to stage
        stage.addChild(btn);
    }
    #endregion


    #region ButtonActions

    void onButtonClick( CEvent e ) { // MouseEvent but be declared as CEvent
        MouseEvent mouseEvent = e as MouseEvent; // Cast event
        Debug.Log("onButtonClick() Called");
    }

    void onButtonEnter( CEvent e ) {
        MovieClip m = e.currentTarget as MovieClip;
        m.gotoAndStop(2);
    }

    void onButtonLeave( CEvent e ) {
        MovieClip m = e.currentTarget as MovieClip;
        m.gotoAndStop(1);
    }

    #endregion
}
Step 6
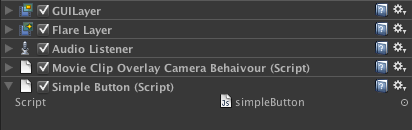
And finally to bring it all together, simply attach the "simpleButton.js" class to the "Main Camera" by dragging it from the project to the "Main Camera" in the hierarchy .
Hit play and mouse over the btn, click it and mouse out.
Check out our next tutorial to see how to use uniSWF Tweener