Basic tweening
Basic tweening
Before starting this tutorial please ensure that you have read through tutorial 1 "Getting Started" and tutorial 2 "Basic Button Script", this tutorial assumes you have already integrated a button asset as in the previous tutorial. We are also going to use a uniSWF logo asset to apply tweens with the uniSWF Tweener class.
Step 1
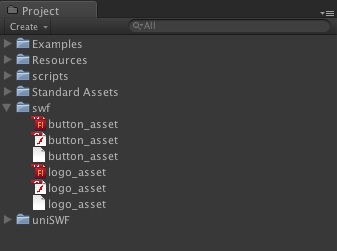
In Unity create a file called "swf" in your project panel. Next in Flash, create a new fla called "logo_asset.fla". Now, import the supplied uniSWF logo image and create a new MovieClip called "logo_img". Make sure the MovieClip is exported. Generate the swf and uniSWF will automatically convert the asset for you. Save the "logo_asset.fla" into the "swf" folder.
Repeat the same process for the button asset, naming the fla "button_asset.fla" and the button MovieClip "btn_ui". You can reuse the asset from tutorial 1 if you wish. Your project should now look something like this...
Step 2
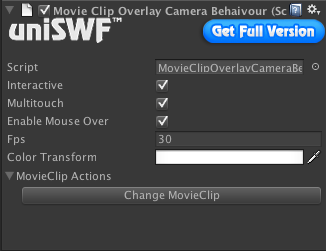
In Unity, create a new scene (File - New Scene) and attach the MovieClipOverlayCameraBehaviour to the "Main Camera" ( This is achieved by first selecting the main camera in the "Hierarchy" and then selecting: Component - uniSWF - MovieClipOverlayCameraBehaviour. The uniSWF inspector will now be available when selecting the "Main Camera". As we are making a button, go to the uniSWF panel in the "Main Camera" inspector and enable (tick) the following - "interactive" and "enable mouse over" (See Picture). This is important as the button is an interactive entity.
Step 3
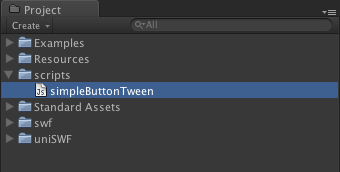
In the Unity project create a "scripts" folder. Within this folder create a new JavaScript file called "simpleButtonTween.js"
Step 4
To utilise the Tweener class, we need to import it first using the following line of code...
import pumpkin.tweener;The following code is the simpleButtonTween.js class. This is the entire code used within this tutorial. The below code initiates the Flash assets, positions them in your scene, adds mouse listeners and also some basic Tween functions.
#pragma strict

import pumpkin.events;
import pumpkin.display;
import pumpkin.tweener;

public class simpleButtonTween extends MonoBehaviour {

    var stage:Stage;
    var logo:MovieClip;

    function Awake() {

    }

    function Start () {


        // validate MovieClipOverlayCameraBehaivour ist attached to camera
        if( MovieClipOverlayCameraBehaivour.instance == null ) {
            return;
        }

        // assign stage reference
        stage = MovieClipOverlayCameraBehaivour.instance.stage;


        // create instance of logo
        logo = new MovieClip("swf/logo_asset.swf:logo_img");
        logo.x = 600;
        logo.y = 350;

        // add logo to stage
        stage.addChild(logo);


        // create instance of button
        var btn_rotation:MovieClip =new MovieClip( "swf/button_asset.swf:btn_ui" ) ;
        btn_rotation.x = 300;
        btn_rotation.y = 350;
        btn_rotation.gotoAndStop(1);
        btn_rotation.mouseChildrenEnabled = false;

        // event listeners
        btn_rotation.addEventListener( MouseEvent.CLICK, onButtonRotationClick);

        // add to stage
        stage.addChild(btn_rotation);
    }


    //
    // rotation function
    //

    function onButtonRotationClick(e:MouseEvent):void {

        // remove any active tweens
        Tweener.removeTweens(logo);

        // reset logo rotation
        logo.rotation = 0;

        // animate tween - rotate logo CCW to 360 degrees
        Tweener.addTween(logo, {"time":3,"rotation":360,"transition":"easeOutCubic" } ).OnComplete( OnLogoRotated );
    }


    //
    // rotation complete function
    //

    function OnLogoRotated():void {

        // animate tween - rotate logo CCW to 0 degrees
        Tweener.addTween(logo, {"time":3,"rotation":0,"transition":"easeOutCubic" } );
    }
}